Friday, 25 February 2011
Further detail
http://www.pixar.com/shorts/mnc/theater/mnc_480.html
The above link is a short clip in which he has a new car. Towards the end of the animation, Mike starts to get annoyed with his friend and uses his forhead creases to show that he is getting angry. The creased forehead is instead of an eyebrow. As the majority of the expressions come from the eyebrow or creased forehead it is essential that i choose correctly what one i will choose for Gooey Goo.
It is not only the creased forehead that creates expression for Mike, it is also the eye lids. If the top one is slightly covering his cornea this usually shows that the character is quite angry/moody.
Friday, 11 February 2011
Character Profile
This is my characters profile, it has been written in a first person style to make it slightly more realistic.
General Information:
Name: Gooey Goo
Gender: Male
Height: 1.20 Metres
Weight/Build: Fat/blob looking
Hair color and style: Short spiky
Eye color: Green
Distinguishing physical characteristics: Blob looking, gooey, translucent body
Distinguishing mannerisms: Polite, well spoken
Age: 9 and 3/4
Mother’s name: Mrs GooFather’s name: Mr Goo
Name(s) of siblings: 0
Favorites:
Favorite color: Blue
Favorite kind of music: Chart music
Favorite songs: B.O.B. - Nothing on you
Favorite season: Summer
Favorite holiday: Family holiday to the moon because
Favorite movies: Toy Story, Aladdin, Chicken Run, Harry Potter
Favorite T.V. shows: Dennis the Menace
Favorite animal: Monkey
My favorite non-alcoholic beverage is: Chocolate Milkshake
My favorite meal is: Chicken nuggets and curly fries
My favorite snack is: Mars bar
My favorite dessert is: Ice cream
My favorite fruit is: Grapes
My favorite vegetable is: Potato
My favorite people are: My mum, dad and my best friend Jack
I like to watch these sports: Rugby, cricket and football
I like to participate in these sports or exercises: Rugby, cricket, football and tennis
My favorite teams are: London Wasps RFC, Middlesex CCC and all the good football teams
My hobbies are: Watchin TV
I collect: Football shirts
My occupation is: Student
My religion is: Christian
I feel this about religion:
My ideal mate: Someone who likes all the same things I do
If I had three wishes: I would be the best at everything i do, i would have another pair of arms, and finally i would have a second eye
My greatest strengths are: I am very clever, I think i am very friendly and easy to get on with
My greatest weaknesses are: I am quite slow, this makes me upset because i cant play sport
My greatest fears are: heights and roller-coasters
I am also afraid of: spiders, creepy crawlies
It’s hard for me to: do every day things as i am quite small
Childhood:
My earliest memory: Playing in the park with my mum and dad
My favorite toy as a child: Big teddy bear called Tubs
My first day of school: I cried
My best Halloween costume: The pumpkin outfit
The best Christmas: All of them!
Distant Future:
My ideal job: Astronaut so i can go and see my relatives
My current job: None, but my mum wants me to become a paper boy when i am old enough and can ride a bike
Using the morph modifier
1. Create an original shape
2. Clone original shape
3. Make alterations in the mesh to the clones
4. Apply Morpher modifier to the original
5. In the empty slots right click and pick shape from scene (clone)
6. Once this is done you can toggle the transitions between the original and the clones
Using the Auto key function i was able to create a short clip showing my animation from today's tutorial.
Once a short animation has been created it is possible to go into the dope sheet view and create a looped version of this, you would also be able to change the speed of which certain parts of the animation happens (for example the mouth could open really quickly, but close really slowly as opposed to opening and closing at the same speed throughout).
Saturday, 5 February 2011
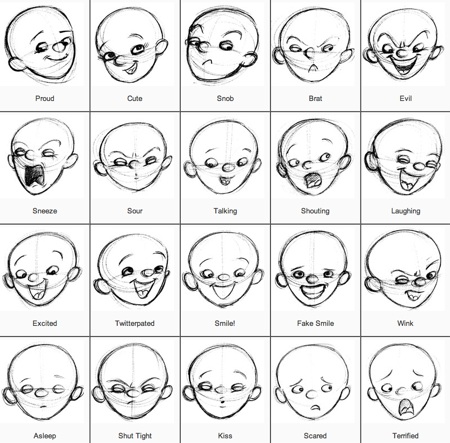
Facial Expressions

Research
Friday, 4 February 2011
Character Studio - Biped Session
I firstly made a human-like looking model, and positioned it into the typical Da-Vinchi pose with its arms and legs spread out. This makes it easier to edit the biped's envelopes. Envelopes are used to tell what part of the model is connected to what part of the biped. In order to do this i first had to apply a physique modifier to the model, once this was done i then attached a node (which is the biped) to the model...these are now attached together.

The above screen shot shows the biped joined to the model. The biped has also been moved about in order to fit into the limbs of the model. Following this i then began to edit the envelopes for the bones of the biped.
I was unable to do this successfully as i could not get about 3 or 4 of the verticies around the hand/arm area. So when it came to animating (see video) the character ended up walking away, but leaving these 3 or 4 verticies where they were. This led to the model stretching out over the timeframe.

As you can see the hands are not ideal. Everything else seems to be looking good though, this was very frustrating. Looking at the animation below you can see what is actually happening to the model. On the other hand i am pleased with how the actual movement of the model is like. The arms seem to be flowing nicely, along with the shoulders and legs.
On a positive note, this time next week i should have my character(s) made up and then i can start on my project =)